![[ Swingley Development ]](../images/title.png)
![[ Jump to Content ]](../images/blank_white.png)
Living Room Renovation -- Winter 2004
Each of the photographs are between 15 - 35 K, so the page will load slowly over a modem link. You can also click on the images to view a larger version. Click on your browsers Back button to return to this page.
Index of pages About Me:
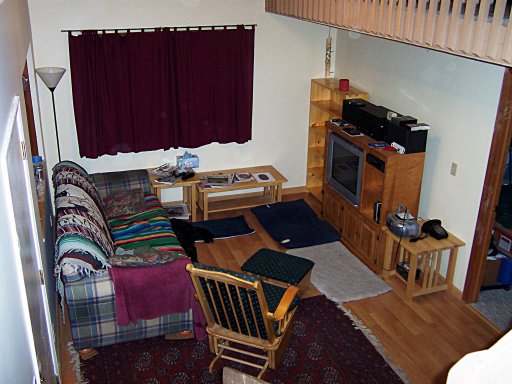
This fall I started working on renovating the living room. The images on this page show the living room after most of the work has been completed. To see what it looked like before, there are older pictures from January 2000 the way it looked shortly after the original carpeting was installed.
I have always disliked several things about the living room and I'm hoping to fix all of them. First is the texturing that was applied to all the walls in the house. A professional texturing job can look pretty good and hides imperfections in the flatness of the walls, but our house wasn't textured by a professional. In addition, the house was painted with a high gloss off-white paint that really emphasizes the texturing.
This needed to go, but because the texturing was so thick and had many coats of paint on it, I couldn't just scrape it off. There were only three ways to get rid of it -- ripping out the drywall and replacing it, covering the walls with a new layer of drywall, and plastering the walls to cover the texturing. I chose the plastering option because my experiences in our bedroom (where I replaced two walls and plastered two) demonstrated that plastering was easier, neater, and resulted in smoother and flatter walls.

In the photos on this page you can see the new walls, with a fresh coat of paint. The lower section of the walls (painted slightly darker) were plastered, while the upper sections (painted with a light cream ceiling paint) were left as is. I didn't want to have to put scaffolding in the room to get the upper sections of the walls. Eventually the line between the two colors and wall textures will be seperated with a picture molding. The transition between the ceiling and the walls (where there's no picture molding) will get a small cove molding.
The second problem with the living room was the carpeting. When we moved in, we were forced to replace all the carpeting in the house because the previous tenants had allowed their cats to urinate everywhere. Had we been thinking more clearly, and had more time to consider our options, we probably wouldn't have installed wall to wall carpeting in the living room. Three cats, five dogs, a wood stove and two people really wreck a carpet in short order, and the living room carpet took the brunt of the abuse.
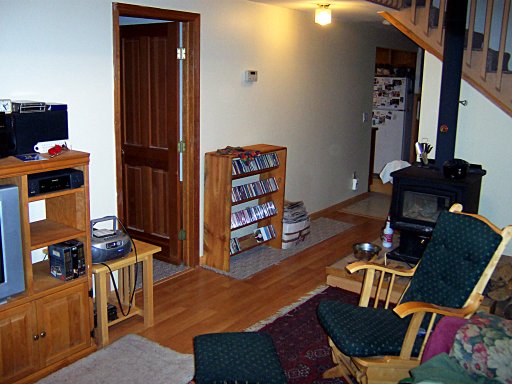
So I ripped it out, removed the pad and tack strips and installed laminate flooring. We choose Hampton TrafficMaster in Honey Oak because it was inexpensive (less than $2 / square foot), very durable, and the color matches lighly stained white oak fairly closely. I would ordinarily install true hardwood flooring, but this was much easier to install and should hold up better if we decide to sell the house. It only took a day to get rid of the carpet and replace it with the laminate floor. Another day was spent on the baseboard moldings and transitions.
The last thing I don't like about the living room is the stairs. They're carpeted with the same carpeting we used in the living room, but now that we've got a "hardwood" floor, it only makes sense to replace the carpeted stairs with oak treads and risers. And the bannister is hideous. The balusters are made from construction grade 2 x 2 lumber, painted a peach color, and the handrail is build from some nasty 1 x 4 lumber that wasn't even planed or sanded smooth. You can see the stairs, as they are now, in the last photo on the left.
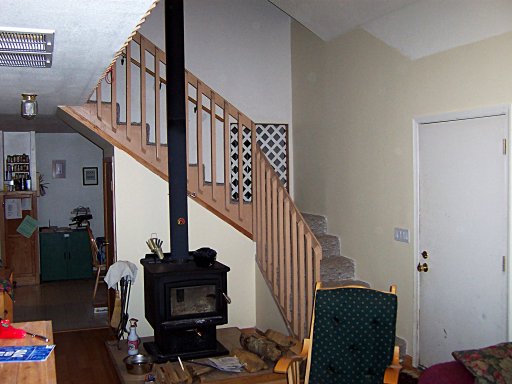
So the next (and final) stage of the project is to replace the treads and risers with oak, build a railing from matching parts, and trim the entire stair and balcony with oak trim.
We're also looking into getting some braided rugs (Capel Rugs from North Carolina) to cover part of the floor, and there will be a stair runner going up the middle of the stairs. Something appropriate will have to be done to replace the pass through going between the stair landing and the kitchen.
Stay tuned for more photos once the rugs arrive, and I start working on the stairs.
[ Last updated Wednesday November 10, 2004 ]